|
Importing Sketches and Pen Work | Four
Kinds of Pen | Ruler | Beta
Fill | Tone | Emanating
Rays | Load Images | White
| Enter Text | Layers |
Save Files
|
| 1.
|
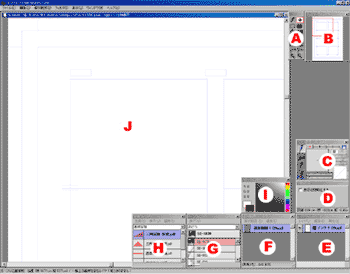
Importing Sketches
and Pen Work. |
 Prepare
your sketch. There are three basic methods. Prepare
your sketch. There are three basic methods. |
|
1. Scan in a sketch
Select Import From TWAIN32 from the Layer window.
Import your pencil sketch from the scanner. Images can be
imported as Rough Draft Layers with adjustable opacity.
2. Scan in a completed pen drawing.
Select Import From TWAIN32 from the File menu
to import your pen drawing.
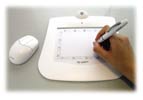
3 .Draw using the computer.
- Do the pen work on a layer separate from the Rough Draft
Layer. The elasticity of the pen can be adjusted with
a slider to give you the same feeling as drawing by hand.
- The Rough Draft Layer is set as a Grayscale Layer
or Color Layer so the opacity can be adjusted. As this
file is just for the initial draft, set the resolution within
150dpi. Low resolution files for use on the internet can be
saved as color or grayscale illustrations in PNG format.
|
| 2. |
There are four types of pen
painting tools. |
| Use
the right pen for the job. |
|
1. Pen
Draws clear ink lines. Can be used as a G-Pen or Milli-pen
after adjusting the elasticity.
2. Pencil
Used for sketching with light-weight lines. You can adjust
the weight of the line with the tablet. Not for printing.
3. Airbrush
Creates a blurry gray effect. You can adjust the weight of
the line with the tablet
4. Airbrush
Creates a blurry gray effect. You can adjust the weight of
the line with the tablet.
|
| 3. |
Ruler |
| Five
straight rulers and four curved rulers useful for line drawing. |
|
Choose the ruler from the Ruler window that best fits your
needs.
Use it like a normal ruler. You can move it around, rotate
it, change the center of rotation, and adjust the size freely.
You can also move or rotate it using the preset values.
|
| 4. |
Beta Fill Technique |
| This
really helps with beta filling and gives it a nice finish! |
|
1. Fill in simple figures
With the Fill a Figure tool, circular and square areas
can be filled in.
2. Fill in complex figures
To fill an area that is completely enclosed without any gaps,
select it with the Automatic Selection tool and then
use the Fill tool to fill it in all at once. (If the
area is not completely enclosed, use the Pen tool to
seal it off before selecting it.) This tool allows you to
fill in wide areas with one click.
*Use a White Layer for creating light reflections such as
in hair.
|
| 5. |
Apply Tones |
| Choose
from a wide variety of tones and apply. |
|
1. Deleter Screens
All Deleter Screens, 240 in all, have three levels of resolution:
300dpi, 600dpi, and 1200dpi. (If you plan to use a Deleter
Screen, set the resolution appropriately when you create a
new file.)
2. Pattern tool
Specify the number of lines and the density of the new tone.
Select the round, linear, or square tone applicator.
3. Gradation
Specify the number of lines and density of the new tone. Apply
in the direction that you drag the applicator. If the 45
Degree box is unchecked, you can set the angle freely.
|
| 6. |
Making Emanating Rays in a Flash |
|
Here's the
technique you need to easily make emanating rays. You can
make all sorts of patterns with parameters.
|
| 7. |
Importing Grayscale or Color
Images |
|
Whether
importing from a scanner or loading a file, if you use the
Open command in the File menu, the Image Monochrome
window will open automatically. You will be given three options
to import the file: Threshold Level to 50%, Dither,
and Pattern Dither. This way you can use photos or
color illustrations of your own by loading them into COMICWORKS.
|
| 8.
|
Using White |
|
1. Use the Eraser
Erase pictures directly with the Eraser.
2. Use a White Layer.
Add a new White Layer (where everything drawn will
appear white) and use the Pen to draw over areas you
would like to erase. Drawing on the White Layer doesn't affect
the actual image; so if you make a mistake, you can just discard
the White Layer to restore the original image.
|
| 9. |
Entering Text |
|
All fonts
installed on your computer are available for use.
|
| 10. |
Take Advantage of Layers |
|
Think of
layers as a stack of transparent screens on which you can
draw. Images drawn on different layers can be handled separately.
There are three basic layers: Ink Layers, White Layers, and
Reverse Layers and two Rough Draft Layers: Grayscale and Color
Layers. Keep in mind that Rough Draft Layers will not be visible
in the completed image. You can save them for the web.
|
|
1. Ink Layer
Objects drawn with the Pen or Pencil appear normally in black.
2. White Layer
Objects drawn with the Pen or Pencil appear in white. Useful
for touching up or highlighting. White tones and white text
can be placed over tones or text on the ink layer.
3. Reverse Layer
Writes in black over white areas and in white over black areas,
always displaying the opposite of the layer below. This makes
effects that are difficult to draw by hand easily accessible.
• Rough Draft Layer
1. Grayscale (8bpp) Layer
This layer is in an 8-bit 256 color grayscale. Unlike the above
two tone (1-bit) layers, this is a high resolution layer that
can take up a lot of memory, so we recommend setting the resolution
at 150dpi or lower. You can adjust the opacity of this type
of layer.
2. RGB Color (24bpp) Layer
This layer is capable of 24-bit color (16.7M colors). This layer
requires more memory than a grayscale layer, so watch your available
memory. You can adjust the opacity of this type of layer. |
| 11.
|
Save Files in Five Formats |
|
The following
five file formats are supported: CWX (COMICWORKS files), BMP,
PSD, PNG, and JPEG.
|